Install the app
How to install the app on iOS

Follow along with the video below to see how to install our site as a web app on your home screen.

Note: This feature may not be available in some browsers.

napsgeareudomestic
bannednutritionRegenRx

Napsgear: The 6 Squat Types Every Lifter Should Know

richardbrown

VIP Rep
gearpic-jpeg.jpg


Have you tried them all?

Squatting is a fundamental movement pattern, yet when we think of squats, we typically see a barbell across the back. There are many more choices, many of which are better suited to various lifters with various levels of expertise or objectives.

These six squat variations are essential for any lifter to master.

The Goblet Squat
One of the best exercises for beginners or lifters who need to review their squat technique is the goblet squat. When done with higher repetitions or a heavy load, they're also a monster for seasoned lifters.

Goblet squats aren't a requirement in and of themselves for other squat variations, but you can use them to gauge your readiness.

1. With both hands, hold a dumbbell at your sternum.
2. To begin, place your feet shoulder-width apart with your toes pointed out. Everyone's hips are not the same form or even symmetrical from left to right, so move your feet to locate a sweet spot that provides the most range of motion for your hips without experiencing any pain.
3. Try to use your feet to grab the ground.
4. Keep your knees vertically stacked with your ankles and hips by externally rotating your femurs with your glutes.
5. Put your shoulders back and down. By securing your ribs to your pelvis, engage your core.
6. As far as you can squat while controlling your descent, descend.
7. Push with your entire foot to change direction.
8. Squeeze your glutes to lock out, but avoid overlocking your lumbar spine.
9. Avoid making the typical error of bending your lower back to produce an unnatural resting position while gripping the dumbbell.

BEST FOR
• Beginners
• If you find it difficult to squat to parallel
• If you can't move properly in a back squat, are tall, or have lengthy femurs
• If the only weights you have are dumbbells or kettlebells
• Whenever shoulder mobility makes a back squat impossible
• To intensify your upper back and core exercises
• To warm up your hips and ankles


The Bulgarian Squat
The Bulgarian squat is both effective and loathed. Bulgarians, also referred to as a "rear-foot elevated split squat," address the demand for single-leg training in regimens that are overly concerned on bilateral exercises. They're perfect for maximizing training results and reducing joint stress.

1. Elevate your rear foot, preferably with the laces down, by placing it on a bench, a roller on a leg extension or hamstring curl machine, or a single-leg squat stand.
2. Dumbbells by your sides, one dumbbell in goblet position, a barbell, or a safety squat bar are all options.
3. To avoid looking like you are walking a tightrope, space your feet shoulder-width apart.
4. Emphasize the push into your heel as you load primarily via your front leg and firmly through the entirety of your foot.
5. To emphasize your glutes slightly, maintain a vertical shin angle and a forward torso angle. For greater quad emphasis, allow more forward knee travel and maintain a more upright posture.
6. extend the range of motion in your front hips completely. If your back knee touches the ground before you exhaust your hip range of motion, raise your front foot to give yourself additional flexibility.
7. Instead of keeping your back leg straight, let your back knee to bend (common error).
8. When you reach the top, fully extend your front knee till it softly locks out.
9. Complete every rep on one side before switching. If necessary, take a brief break in the middle of a heavy set.

BEST FOR
• When your lower back is injured, use this as a primary leg exercise
• Increasing the volume of your leg workouts without overtaxing your spine or becoming exhausted
• As the main single-leg lower-body exercise
• When designing sports programs for athletes
• When you can only use dumbbells
• In case you're a masochist
• As a more accommodating substitute for walking lunges


The Box Squat
When lifters struggle to manage their range of motion, the box squat works like magic to force them to stop at a safe range or to feel at ease squatting lower.

It works effectively as a stand-alone lift, a method for teaching people how to squat, or a way to clean up messy, uncontrolled squats. It can also be a sophisticated tool for experienced lifters to build strength out of a squat's bottom or to add variety and break up staleness.

1. Set the height of a box or bench as required.
2. Select from the back, goblet, front, or Safety Bar squat variations.
3. Inhale deeply and tighten up at the top. Until close to or at the lockout at the top of the rep, maintain your air and brace.
4. Return to the box and land gently and deliberately.
5. Use a gentle touch-and-go or a pause of 1-2 seconds. Do not bound or make a strong impact.
6. Maintain your torso angle at the bottom. When you feel the need to sit up straight, fight the urge and start to rock forward as you get off the box.

BEST FOR
• When you’re just starting off, as a training tool
• Providing shallow squatters with a target to reach
• If you can't maintain a neutral spine at the bottom, restrict range of motion.
• To build parallel or deeper strength and control by pausing
• Assisting you lean back further into your heels and posterior chain.
• To gain control over a wider range of motion (as long as you possess the passive hip range of motion)


Page 1
 
The Front Squat
Consider front squats as a more challenging version of goblet squats. Anterior loading helps both because it promotes a more "true" vertical squat pattern. Simply put, front squats let you lift more weight.

A front squat's upright stance enables a stronger focus on knee flexion/extension as well as better targeting of the quadriceps for tension and growth. There may be less strain on your posterior chain because your quadriceps are carrying more of the weight.

The load being in front of the body also induces a posterior weight transfer, which enables taller lifters or lifters with mobility issues to practically automatically "hack" their squat depth. With their increased demands on the core, upper back, and postural stability, they're also among the finest workouts for improving squat technique.

Since they minimize excessive forward lean, front squats tend to be spine-friendly exercises because they limit shear stress. Front squats are a better option for lifters who want to lift big without aggravating lower-back problems because your spine is more resistive to compression than shear stress.

1. Place the barbell in the rack at a height about equal to your shoulder.
2. With your hands at shoulder width, grasp the bar with a clean grip, a cross-grip, or straps (see here).
3. Before unracking, wedge the bar just above your collarbones while maintaining your elbows up to keep your triceps parallel to the ground.
4. Set your feet in your favorite squat stance and support your torso as you unrack the bar and step back.
5. Throughout the set, make an effort to keep your torso somewhat vertical and your elbows at or above bar level.
6. In general, because to the demands on posture, breathing, and bracing, keep the reps modest (3-6).

Bonus Suggestion: Try elevating your heels on a wedge or small plates to emphasize the knee flexion if you really want to maximize your chances of looking like Quadzilla for Halloween.

BEST FOR
• Encouraging a more vertical squat pattern
• Deloading the spine, and to lessen shear/compressive low-back stress
• Working the quads hard.
• Increasing hip and ankle mobility and squat depth
• To enhance postural integrity and improve squat mechanics
• To develop the strength necessary for Olympic cleans


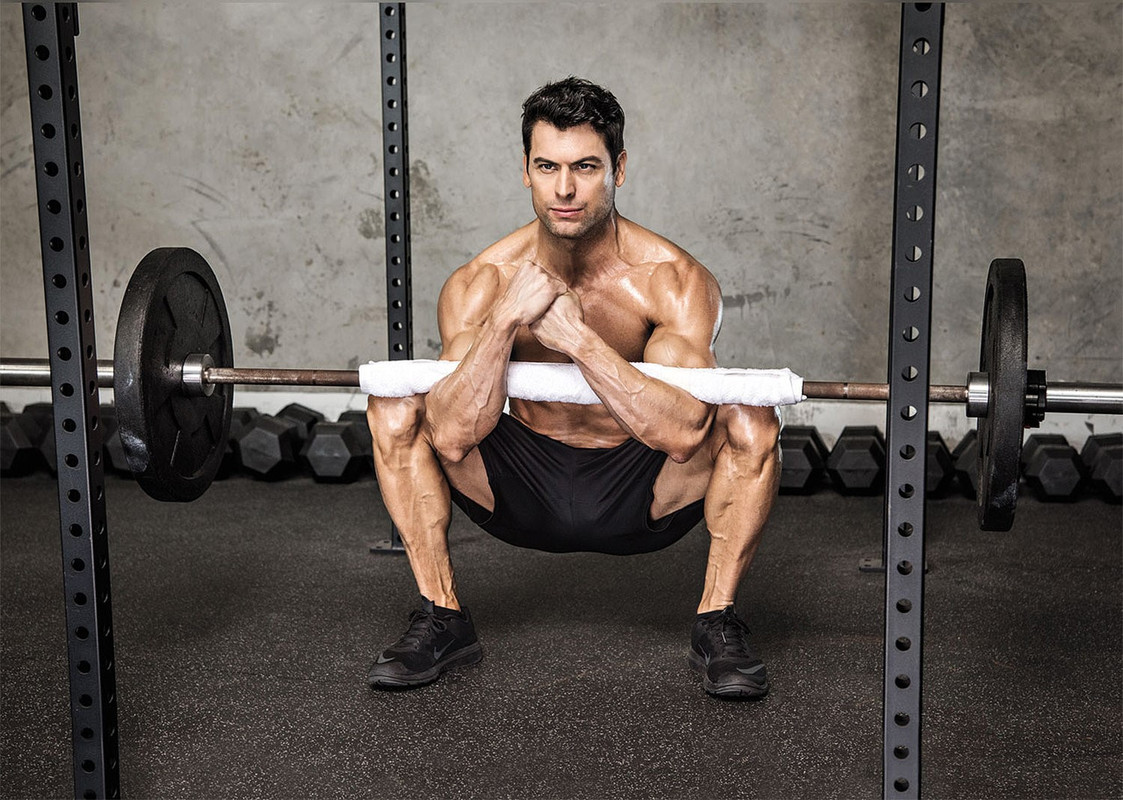
The Zercher Squat
The Zercher squat will work your quads particularly hard, test your core, decompress your spine, and force you to maintain an upright posture.

They'll test your ability to brace, breathe, and sustain full-body tension as well as your traps and rhomboids. Your ability to hold a stable position with a bar on your back should greatly improve with these increased efforts with the bar pulling you forward and down.

1. The barbell should be positioned in the rack at or just below your sternum.
2. Put your hands together under the bar with your palms towards the ceiling, then hold the bar in the crook of your elbows. Your arms won't extend if your hands are clasped together. This will enable you to use bigger loads, yet if you want to put more of a strain on your upper back and arms, you can keep them apart.
3. Scoop the bar up and tuck it into your torso to secure it in after bracing.
4. Remove the bar from the rack, get into your favourite squat position, then set the bar down and "grab" additional air.
5. Keep your elbows tucked down to your sides the entire set, and try to keep your body fairly vertical.
6. Due to the respiratory and bracing needs, keep the rep counts modest (3-6).

You can apply Fat Gripz around the bar, use an axle bar if you have one, or wear long sleeves in the meantime until you get acclimated to the soreness in your biceps and elbows.

BEST FOR
• Holding the load in front without using the front rack
• To enhance full-body tension under load
• Building muscle for fighting or strongman sports
• Increasing trunk rigidity and strength
• Making your back squat better
• Using a fresh stimulus to train a vertically-biased squat pattern


The Safety Bar Squat
A cross between a front and back squat is the Safety Bar squat. Due to the weight distribution and bar location, they stimulate a vertical squat just like front squats do. Additionally, they can support larger loads than front-loaded varieties, similar to back squats.

It is also joint-friendly. The improved comfort of the front-loaded grips can be a game-changer if your shoulders don't respond well to excessive external rotation (as in a back squat). Additionally, the weight is distributed parallel to the body, which might lessen shear stress on the low back.

Your legs are the only thing holding you back. You may destroy your lower body and build up more quality volume without being hindered by exhaustion elsewhere.

These squats are comparable to back squats enough to directly transfer strength while being dissimilar enough to offer a marginally unique stimulus. One study that compared SSB squats to back squats discovered that SSB squats resulted in 13.9 percent greater improvements in 1-RM back squat strength (35.8 percent vs. 21.9 percent) than the back squat alone.

1. Secure the rear pad by crawling beneath the bar, right behind your upper traps.
2. Your hands should be between chest and shoulder height when you lift your elbows (rather than pinned to your sides).
3. Adjust your position as necessary right before and after the unrack to get the camber (load) lined up with the mid-foot.
4. Try to keep your thoracic extension throughout the set without allowing your upper back slump forward.
5. To avoid having the bar slam into your neck, keep your elbows stable (as opposed to diving down).

BEST FOR
• Developing legs without any obstacles getting in the way
• Performing a vertical squat pattern without having to deal with the discomfort of a front rack
• Performing a big squat without hurting your shoulders or low back
• For an immediate strength transfer to the back squat


Page 2
 
Top Bottom